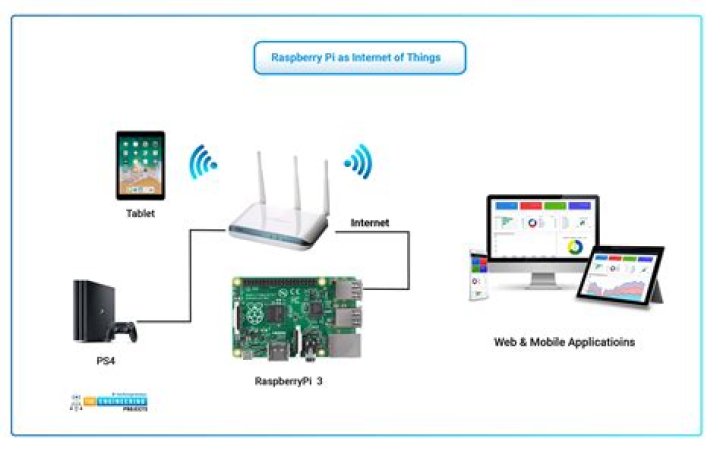
Setting up a remote IoT system behind a router with a Raspberry Pi is a cost-effective solution for managing smart devices and automating tasks. Whether you're a hobbyist or an experienced developer, leveraging Raspberry Pi for IoT projects offers flexibility, scalability, and ease of use. This guide will walk you through creating a reliable remote IoT setup without breaking the bank.
In today's fast-paced world, the Internet of Things (IoT) has revolutionized the way we interact with technology. From smart homes to industrial automation, IoT applications are transforming industries and improving daily life. However, setting up a remote IoT system can be challenging, especially when dealing with network restrictions such as routers or firewalls.
This comprehensive guide will explore the best methods and tools to establish a remote IoT setup behind a router using Raspberry Pi for free. By the end of this article, you'll have all the knowledge needed to build a secure, efficient, and budget-friendly IoT system. Let's dive in!
Biography of Raspberry Pi
Before we dive into the technical aspects, let's take a moment to understand the origins and capabilities of Raspberry Pi.
Data and Specifications
| Feature | Details |
|---|---|
| Release Date | February 29, 2012 |
| Creator | Raspberry Pi Foundation |
| Operating System | Raspberry Pi OS, Ubuntu, and others |
| Processor | ARM Cortex-A53 (varies by model) |
| RAM | 512MB to 8GB (depending on model) |
Raspberry Pi was created by the Raspberry Pi Foundation to promote the teaching of basic computer science in schools and developing countries. Over the years, it has become a favorite among hobbyists, developers, and educators for its versatility and affordability.
Getting Started with Raspberry Pi
To begin your remote IoT setup, you'll need the following hardware and software:
- Raspberry Pi (preferably Raspberry Pi 4 for better performance)
- MicroSD card with Raspberry Pi OS installed
- Power supply
- Network cable or Wi-Fi connection
Ensure that your Raspberry Pi is properly configured and connected to your local network. You can use tools like Raspberry Pi Documentation to guide you through the setup process.
Setting Up Your Router
Your router plays a crucial role in enabling remote access to your IoT devices. Follow these steps to configure your router:
Port Forwarding
Port forwarding allows you to direct external traffic to your Raspberry Pi. Here's how to set it up:
- Log in to your router's admin panel.
- Locate the port forwarding section.
- Add a new rule to forward traffic from an external port to your Raspberry Pi's internal IP address.
Static IP Address
Assign a static IP address to your Raspberry Pi to ensure consistent connectivity:
- Access your router's DHCP settings.
- Reserve an IP address for your Raspberry Pi's MAC address.
Enabling Remote Access
Once your router is configured, you can enable remote access to your Raspberry Pi using:
- SSH (Secure Shell)
- Remote Desktop Protocol (RDP)
- VNC (Virtual Network Computing)
For SSH access, use tools like PuTTY or the built-in SSH client in Raspberry Pi OS. Ensure that SSH is enabled on your Raspberry Pi by running the following command:
sudo raspi-config
Choosing the Best IoT Platforms
Selecting the right IoT platform is essential for building a robust system. Some popular options include:
- Home Assistant
- Node-RED
- Adafruit IO
Each platform offers unique features and integrations. For example, Home Assistant provides a user-friendly interface and supports a wide range of smart devices.
Ensuring Security
Security is paramount when setting up a remote IoT system. Follow these best practices:
- Use strong, unique passwords for all accounts.
- Enable two-factor authentication (2FA) wherever possible.
- Keep your software and firmware up to date.
Additionally, consider using a firewall or intrusion detection system to monitor and protect your network.
Troubleshooting Common Issues
Here are some common issues and their solutions:
- Unable to connect via SSH: Verify that SSH is enabled and check your IP address configuration.
- Port forwarding not working: Ensure that your router's settings are correct and restart the router if necessary.
- Slow performance: Optimize your Raspberry Pi's configuration and reduce background processes.
Optimizing Performance
To maximize the performance of your Raspberry Pi-based IoT system:
- Use lightweight software and services.
- Regularly clean up unnecessary files and updates.
- Monitor system resources and adjust settings as needed.
Consider using tools like htop or glances to monitor your Raspberry Pi's performance in real-time.
Cost-Effective Solutions
Building a remote IoT setup with Raspberry Pi is budget-friendly due to:
- Low-cost hardware.
- Free and open-source software options.
- Community support and resources.
By leveraging these advantages, you can create a powerful IoT system without incurring significant expenses.
Conclusion
In conclusion, setting up a remote IoT system behind a router with Raspberry Pi is an excellent way to explore the possibilities of IoT technology. By following the steps outlined in this guide, you can build a secure, efficient, and cost-effective system tailored to your needs.
We encourage you to share your experience or ask questions in the comments below. Don't forget to explore other articles on our site for more insights into IoT and Raspberry Pi projects. Together, let's shape the future of connected technology!