As the world of IoT (Internet of Things) continues to grow, the demand for remote access solutions that work efficiently behind routers has never been higher. Whether you're a hobbyist, developer, or professional, setting up remote IoT systems using a Raspberry Pi is an excellent way to explore and innovate. However, finding the best free solution can be overwhelming. This article is designed to help you navigate through the options, understand the technicalities, and make an informed decision.
Remote IoT systems have become indispensable in various industries, from home automation to industrial monitoring. The ability to control and monitor devices remotely enhances convenience, productivity,, and security. With the Raspberry Pi being one of the most popular platforms for IoT projects, it's essential to know how to set up remote access without breaking the bank.
This guide will delve into the best remote IoT solutions that work seamlessly behind routers, specifically for Raspberry Pi users. By the end of this article, you'll have a clear understanding of the tools, techniques, and configurations required to establish a reliable remote IoT setup—all for free.
Introduction to Remote IoT Behind Router
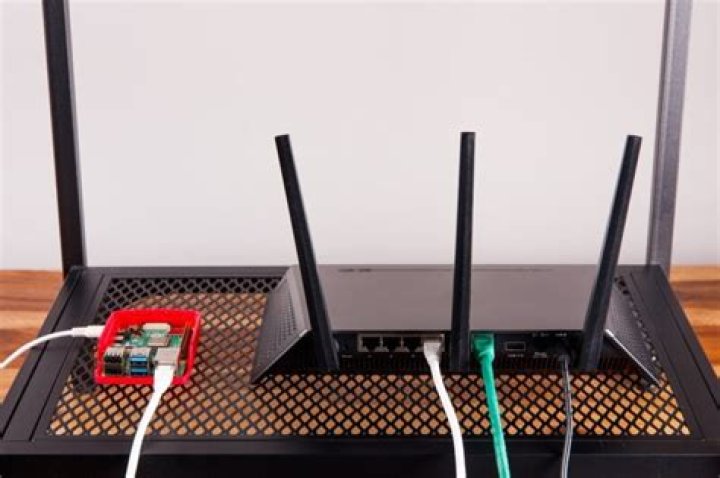
Remote IoT (Internet of Things) access is the ability to control and monitor IoT devices from anywhere in the world. When working behind a router, it becomes crucial to ensure that the connection is both secure and stable. For Raspberry Pi users, this means configuring the device to bypass NAT (Network Address Translation) restrictions imposed by most routers.
There are several methods to achieve this, ranging from port forwarding to using third-party services. While paid solutions often come with additional features, there are plenty of free options that are just as effective. Understanding these methods is key to setting up a reliable remote IoT system.
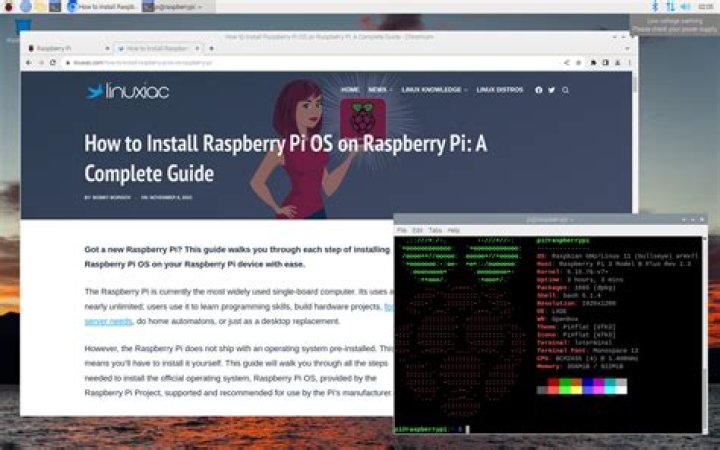
Raspberry Pi Basics
The Raspberry Pi is a compact, affordable single-board computer designed for educational purposes but widely used in various applications, including IoT projects. Its versatility, low power consumption, and extensive community support make it an ideal platform for remote IoT setups.
Why Raspberry Pi?
Raspberry Pi offers several advantages for remote IoT projects:
- Low cost and energy-efficient
- Extensive support for Linux-based operating systems
- Wide range of compatible hardware and software
- Active community and abundant resources
Why Choose Free Options?
While paid services may offer additional features like advanced security protocols and customer support, free options can be just as effective for most users. They eliminate the recurring costs associated with subscriptions and provide a great learning opportunity for those interested in understanding the underlying technology.
Moreover, free solutions often encourage users to gain deeper knowledge of networking concepts, such as port forwarding and SSH tunneling, which are valuable skills in their own right.
Top Solutions for Remote IoT
1. Port Forwarding
Port forwarding is one of the simplest methods to access your Raspberry Pi remotely. It involves configuring your router to direct incoming traffic on a specific port to your Raspberry Pi's local IP address.
Steps to Configure Port Forwarding:
- Log in to your router's admin panel
- Locate the port forwarding section
- Set up a rule to forward a specific port to your Raspberry Pi's IP address
- Test the connection using a tool like YouGetSignal
2. SSH Tunneling
SSH (Secure Shell) tunneling is another popular method for secure remote access. It allows you to create an encrypted connection between your Raspberry Pi and a remote device.
Advantages of SSH Tunneling:
- Highly secure
- Easy to set up
- Works behind most routers
3. Third-Party Services
Several free third-party services offer remote access capabilities for IoT devices. Some of the most popular ones include:
- ngrok - Provides temporary URLs for secure tunneling
- LocalTunnel - Offers a simple way to expose local servers to the internet
- PageKite - Allows you to expose local web servers to the internet
Configuring Your Raspberry Pi
Before setting up remote access, it's essential to configure your Raspberry Pi properly. This includes updating the operating system, setting up a static IP address, and enabling SSH.
Steps to Configure Your Raspberry Pi:
- Update the operating system using
sudo apt update && sudo apt upgrade - Set a static IP address in the
/etc/dhcpcd.conffile - Enable SSH in the Raspberry Pi Configuration tool
Securing Your Remote Connection
Security is paramount when setting up remote access. Here are some best practices to ensure your connection remains secure:
- Use strong passwords or SSH keys
- Enable two-factor authentication (2FA) if supported
- Regularly update your Raspberry Pi and router firmware
- Monitor incoming connections for suspicious activity
Troubleshooting Common Issues
Even with proper configuration, issues may arise. Here are some common problems and their solutions:
- Unable to connect: Check your router's firewall settings and ensure port forwarding is correctly configured.
- Connection drops frequently: Verify your internet connection and consider upgrading your router if necessary.
- Slow connection: Optimize your Raspberry Pi's performance by disabling unnecessary services.
Advanced Techniques
1. Dynamic DNS
Dynamic DNS (DDNS) allows you to assign a domain name to your Raspberry Pi, even if your IP address changes. This is particularly useful if your ISP does not provide a static IP address.
2. Reverse SSH Tunneling
Reverse SSH tunneling is a technique where the Raspberry Pi initiates the connection to a remote server, allowing you to access it from behind a restrictive firewall or NAT.
Cost Considerations
While free solutions eliminate subscription costs, there may be other expenses to consider:
- Hardware costs for additional components
- Time investment for setup and troubleshooting
- Potential costs for advanced features in third-party services
However, these costs are generally minimal compared to the benefits of having a reliable remote IoT setup.
Conclusion and Next Steps
In conclusion, setting up a remote IoT system behind a router using a Raspberry Pi is both feasible and cost-effective. By leveraging free solutions like port forwarding, SSH tunneling, and third-party services, you can create a secure and stable connection without incurring recurring costs.
We encourage you to take the following steps:
- Experiment with the methods discussed in this article
- Join online communities to learn from other Raspberry Pi users
- Share your experiences and tips in the comments section below
Thank you for reading, and we hope this guide has been helpful in your IoT journey. If you have any questions or feedback, feel free to leave a comment or explore other articles on our website.